

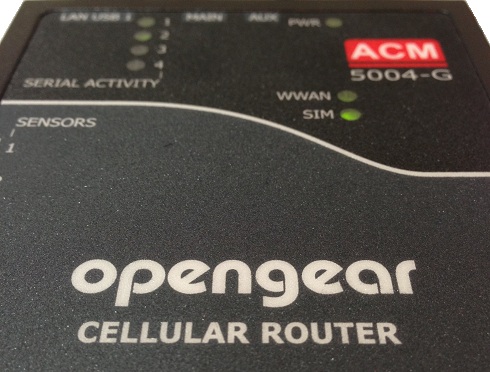
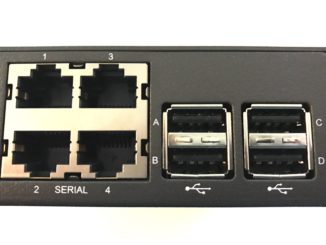
As mentioned in my overview of the Opengear presentation at Networking Field Day 4 (NFD4), I’ve been setting up one of their entry level console servers, the ACM5004-G cellular router. This little box (about 4″ square and 1″ high) has four RJ45 serial ports, an Ethernet port, a USB port (for log storage on a flash drive) and a 3G wireless radio.
So how does it measure up as a console server?
What’s In The Box?
I’m quite impressed actually – the box included pretty much everything you would need to get started and connected to your first device.
Accessories

The first things I’ve pulled out of the box are a single rackmount bracket (the ACM5004-G mounts on just one side), four rubber feet, and two DB9F-RJ45 adaptors, one “straight” and one “crossover”.
Power Supply

The power supply is modular, and comes with four attachable plug options. It’s a simple matter to slide the chosen connector in to the power supply and it’s ready to go.
Antenna

The 3G antenna comes with a short extension and a mounting bracket so that the antenna can be attached firmly to the side of the ACM5004-G. The notes say that for the AT&T version of the ACM5004 you need to use the coax extension and the external antenna, but for other carriers (e.g. Verizon) you can attach the antenna directly to the back of the unit. I’m not sure entirely why (or what that indicates about the respective carriers), but that’s the rule.
ACM5004-G
And finally, the man of the hour, the ACM5004-G Cellular Router.

Interestingly, the product pictures for the ACM5004-G on the Opengear website all show a device with a single antenna port, but as you will see from the rear view picture above, it clearly has dual ports. I’m definitely confused by this, because the Technical Specifications page suggests that only the ACM5004-G-I model has dual SMA ports, but I know this is just an ACM5004-G, and I can count the connections. I will follow up with Opengear to find out if I’m missing something here, and I’ll add an update if I get some clarity.
AND NOT SHOWN
Not pictured, but also included in the box, are two roughly 5 foot long Cat5 cables that can be used for Ethernet or serial connections, a software CD, a QuickStart Guide, an “SDT Connector” guide and a “PortShare” guide (Portshare allows you to create a virtual serial port for your Windows/linux machine).
What’s In A Name?
Calling the ACM5004-G a “Cellular Router” is the first clue that this device is more than just a regular terminal server. We talked about this briefly in the NFD4 session, and this really seems to be a product that defies categorization without that categorization limiting the impression of what the device can do. The ACM in the name is short for Advanced Console Management – and from what I see, I think that only begins to describe what this unit could do, especially if you start writing bash scripts to customize trigger actions. Add in the optional sensor ports and the ability to manage Remote Power Controller(RPC)/IP-PDU devices and it’s clear that this has the potential to be a powerful tool for device management and support when deployed in data centers, or indeed anywhere else. On that basis neither “ACM” nor “Cellular Router” truly cover what this device can/could do (and no, I don’t have any suggestions for a better name), but I can already see ways to use this in a very non-standard way.
The Hardware
Let’s start with the basics – what does this thing run on?
# uname -a
Linux opengear1 2.6.30.2-uc0 #1 Fri Jul 27 02:23:59 EST 2012 armv4tl unknown
# cat /proc/cpuinfo
Processor : ARM922T rev 0 (v4l)
BogoMIPS : 123.13
# grep MemTotal /proc/meminfo
MemTotal: 29368 kB
# grep SwapTotal /proc/meminfo
SwapTotal: 0 kB
# df -k
Filesystem     1k-blocks   Used Available Use% Mounted on
/dev/mtdblock3     11136  11136         0 100% /
tmpfs                512    100       412  20% /var
/dev/flash/configblock
                    2048    544      1504  27% /etc/config
Put succinctly – if I’m reading this right – this particular device uses an ARM 922T microprocessor with about 29MB (it’s actually 32MB) of memory, and a small amount (16MB) of flash storage for configuration files and dynamic data (e.g. local logs and customizations). It should be clear then why there’s an external USB port for log storage – you can’t store much of anything internally! The system runs on uClinux, an embedded linux.
Note that to get that information, I’m able to log in to the ACM5004-G as the root user (if I want to) and I can dig around. The Opengear philosophy seems to be that you paid for it, so you get access to it – and I like that!
Racking
Connecting the rack mount bracket requires three small screws. Similarly the antenna bracket can be attached to the side of the unit with three identically small screws. Or rather, it can be attached with two of the three provided small screws, because the third screw hole is blocked by the antenna cable that mounts through the front of the bracket. I suppose I could unbolt the (very tightly affixed) antenna mount, but that was too much hassle. I then bolted the unit in at the top of my rack – it sneaks in nicely and takes up very little space.

On this particular rack, the mounting rails sit back from the front of the rack frame (as will be the case in many cabinets), so you need to check whether you can fit the antenna in without hitting the frame. In this case, the angled joint on the antenna brings it just far enough forward to miss the rack. There are two antenna ports on the back – you can use the AUX port for antenna diversity (could be very handy), or – on some models – for GPS.
One final thought is that if you have a variant of the 5004 with the sensor ports, the green terminal block for sensor connections sticks out of the left hand side of the unit (as you look at it above), which might mean that if you rack mount it, you would have to mount on the right hand side, not the left as shown above.
There is also a DIN Rail rack mount option included with the ACM5004-G-I, which may be of use in some installations. The ACM5004-G-I also tolerates much wider temperature variance, and is clearly the hardcore version of the product for use in strange locations.
Network Setup
The QuickStart Guide is straightforward – connect Ethernet, the antenna and power, and wait for it to boot. Boot up takes about 50 seconds or so, after which the ACM5004 is available on the network either by its default address of 192.168.0.1 or – if you have DHCP enabled – on an address assigned by your DHCP server. One final alternative is to use ARP-Ping to set the IP. On Windows this is normally accomplished by configuring a static ARP entry for the desired IP, then issuing a ping to that IP. It would appear that if DHCP is active, the ACM5004 ignores the pings (understandably), so I did not test this successfully.
Initial Configuration
The initial setup is simple – open an HTTPS connection to the IP you set, and login using the default username/password provided in the QuickStart Guide. You are then offered a list of things you need to do in order to set the device up:

Each item is a hyperlink, and you can click on the Opengear logo to come back to the list. As you complete tasks, they update and are marked as ‘done’:

This is a nice approach – it’s clear what’s needed, but it’s not intrusive if you want to stray from the recommended path. One thing missing from the initial configuration task list, in my opinion, is to set the time and date – it’s rather important, as the system seems to default to the unix epoch (i.e. 1970), or thereabouts.
User Configuration
The Users and Groups configuration page is pretty simple. Adding a new user brings up quite a long form, but for a typical user it’s fast to breeze past the options you don’t need. Beware that at the bottom of the form is the Accessible Port(s) configuration which allows a user to access – or not – each individual port:

The default is to allow access to none of the ports, so this will need to be set for each user. Alternatively – and particularly if you have an Opengear device with more than just 4 ports and have a template of some sort that defines what ports each type of user should be able to access (e.g. the network team only needs ports 1-8, and the Unix team needs ports 9-16) – you can set up a custom group, and in the group definition you can allow specific ports. That way when adding a user, you simply define what kind of user they are (network_user or unix_user, for example) and the ports will be automatically assigned to them. If using local authentication I would strongly advise using this method for configuration rather than managing individual user’s rights to ports.
Connecting To A Console
Juniper Netscreen SSG5
Once I had a non-root user configured, I connected one of the serial ports to the console port on a Juniper Netscreen SSG5 firewall using the included Cat5 cable. At this point, I stumbled for a moment as I realized that I didn’t know what TCP port to connect to on the Opengear. I had enabled SSH access only on the serial port, and could not find a place in the GUI that told me what port I should be using for my SSH connection. In the end, I found a section of the PDF manual that talked about defining the base TCP ports for each type of access, and deduced that to connect using SSH to Serial Port 2, I should connect to TCP port 3002. This turned out to be correct, and using the default 9600-8N1 settings, I was able to console successfully into the Netscreen.
Sun Ultra 10
Flush with success, I decided to try connecting to my Sun Ultra 10 server on its serial console port, TTYA – a port provided as a DB25. This one took a little longer to get right, but eventually I got the connection working using the provided 319015 (crossover) DB9F-RJ45 adaptor plugged in to a random DB9 to DB25 adaptor that I dug out of my bag of assorted connectors (amassed over a number of years of maintaining all sorts of odd equipment). It might not look good, but it functions perfectly:

Juniper EX3200
Just like the Juniper Netscreen SSG5, the EX3200 came right up with a direct cable connection. This particular ACM model has “cisco pin-out” ports on it, which is why these are working so easily. Other pin-outs are available, I gather.
3G Connectivity?
Mmm, yeah. Well, unless I happen to find a cheap or free AT&T SIM that works, it may be a while before I get a chance to test the 3G capabilities of this device. I’d love to test it out, but it’s hard to justify paying a monthly fee just for fun. Watch this space, I guess!
Dashboard
Once the ACM5004-G is up and running, the initial configuration task list disappears and the home page on logging in changes to a simple dashboard:

From here you can see who is connected to each port, as well as get status on UPS devices, RPC devices and Environmental monitors. Some of the larger Opengear devices have environmental monitoring built in, by the way.
Gripes So Far
Yes, even though I like how simple this has been to configure, and how thoughtfully everything was provided in the box, I have some gripes. They’re not all necessarily earth-shattering, but they’re things that could easily be fixed and would significantly enhance the product, and/or a user’s confidence in the company.
Firmware Updates
Following the Support link on the Opengear website leads you to a page offering firmware updates for download. It helpfully has a link for each model family to the firmware you need to grab:

However, when you click on the red link for the firmware you want, rather than the download beginning, you are redirected to http://opengear.com/firmware/. This is, let’s say, underwhelming – take a look:

Correct – that’s a directory listing with all the firmware in it. How much effort would it have taken to link directly to the correct file from the previous page? Very little. As a bonus, if you look at the acm500x files, you’ll see there are two of them – 3.5.3u5 and 3.6.0. You’d think 3.6.0 would be newer, based on the version, but you’d be wrong based on the file dates shown here. The explanation is in the Release_notes.txt file, and we were advised to read the notes before downloading, but even so, wouldn’t it be better to have a page for the ACM500x products and explain the differences there, then offer direct download links?
At first I thought this was just an oddity for firmware downloads, but then I looked for a manual.
Downloading a Manual
I don’t want to spoil the surprise, would would it shock you to see that the list of manuals, just like the firmware, all link to the same page – http://opengear.com/download/manual/ – which again is a listed directory:

Seriously? I don’t think any other company I deal with throws files up with quite such abandon. I don’t even really care if there’s a reason for it. The bottom line, sadly, is that it detracts from the image of professionalism that I would think any company would want to portray. This is an easy fix, and one that I believe Opengear would be foolish to ignore.
Editing A Port
Here’s one for you. Changing the configuration on one port appeared to cut off my connection on another one. Yes, you heard correctly. I was connected to Port 2, and then when I applied changes to the configuration for Port 3, my session on Port 2 was terminated. I tested this a few more times with the same result each time. This is unacceptable. If I’m running a 32-port server and I need to configure a new port, I don’t expect committing the configuration for that new port to kill off the sessions for all the other users! I need to dig deeper to see if this is specific to SSH connections, and if it’s covered in the manual somewhere, but whatever the reason, this seems like a big miss to me. It’s like it’s restarting sshd or something, but if so, that’s very uncool.
Setting The Time
Aside from not being on the initial configuration task list, setting the time always has you starting from nothing. Even if you just want to change the minute value, you have to set everything because the form always defaults to 01:01:01 on January 1, 2000:

This turned out to be quite irritating. I know it’s not something we do often, but would it hurt to use a default of the current time when the form is opened?
Perhaps the biggest miss here is a “Set to current computer time” button that will allow me to get it as close as possible to correct by using my computer’s local time to update the Opengear. Then, assuming my computer is reasonably close, I can let NTP do the rest.
Changing the IP Address
Ok, this one’s really picky, but when you change the IP address and click Apply, that’s it – the system never responds. Why? Because the IP changed, dummy. It would be great if the Opengear would return a redirect to the new IP when the form is submitted so there’s a chance I’ll reconnect the session? It sounds obvious, but it’s a small usability change that might be appreciated as part of a busy day’s work.
Adding Users
On the Users and Groups page, it’s a little odd that the Groups are listed first, then the Users second:

Maybe the logic is that you won’t have many groups, so putting them first means that the Users header will always be visible on the first page. Putting Users first might mean if you have 200 users configured, the groups would be pushed off the bottom of the first page and might be thought lost. But from a task perspective I’m more likely to be adding users than groups, so I want that task at the top. And on that note, I’d want the “Add User” button at the TOP of the User list, not the bottom (or put it in both places), because it would rapidly become annoying to have to scroll down to the bottom of the entire page just to add a user once I had a large number of accounts configured.
Twitter Presence
If you want to look active and responsive, wake up that twitter account. Quiet accounts give the impression of a quiet company, and one that won’t give you the support you’re looking for. Interact with us when we mention your name!
Early Conclusions
At this point – with a fairly basic configuration in place – I was able to get the the ACM5004-G up and running over Ethernet and connected to Juniper and Sun devices in about 10 minutes. It really was that simple. Along the way I found some gripes on which I elaborated above. However, as a first interaction with the device, I’m actually pretty happy; I was able to get the Opengear device on my network and connect remotely to serial ports on my devices really quickly.
Next up, I need to dig deeper and see what happens when I do more than just treat this clever little box as a bog standard console server. I’ll report back when I’ve had time to do more.
Disclosure
Opengear was a paid presenter at Networking Field Day 4, and while I received no compensation for my attendance at this event, my travel, accommodation and meals were provided. I was explicitly not required or obligated to blog, tweet, or otherwise write about or endorse the sponsors, but if I choose to do so I am free to give my honest opinions about the vendors and their products, whether positive or negative. Opengear provided me with an entry-level console management device (ACM5004-G), as reviewed in this post.
Please see my Disclosures page for more information.

Nice product review 🙂 Big fans of the ACM5004-G here 🙂 We worked with Opengear to deliver a secure out-of-band console server solution for our customer. The ACM creates an “always on” IPSec VPN back to HQ using dynamic IP over cellular network. Authentication to the ACM can then be provided using HQ RADIUS servers. The remote ACM has no LAN connection, just console to Cisco Router. Nice & secure,, you just ssh/https to the phantom LAN IP address of the ACM (over the VPN) and away you go!!