
![]()
My evening fun one day this week was to enable Transaction Signature (TSIG) capability for zone transfers on my home DNS servers. Yes, I know.
Why? Well, partly because it’s a good idea from a security perspective, and mainly because, well, it was there. Let’s face it, the security issues are probably limited when it comes to my home DNS servers, but that doesn’t stop me doing it for kicks. And since it’s pretty simple, let’s document it, shall we?
Home DNS
I can’t be bothered maintaining hosts files on multiple devices, but I really do like to have name resolution working, and given that I currently have around 50 devices on my home network this is perhaps less of stupid idea than it sounds. I also run IPv6, and the one thing I maintain about IPv6 is that you had better have good DNS, because you’ll never want to type an IPv6 address out even if you can remember it.
To that end, I currently have three DNS servers active, all running Ubuntu server. They are configured like this:
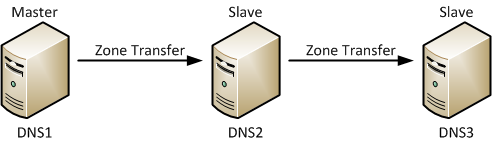
DNS1 is the zone master. DNS2 is set up as a secondary, slaved to DNS1. DNS3 is another secondary, but for fun, rather than getting zone transfers from DNS1, it instead gets a transfer from DNS2. There’s no particular reason for that in my environment other than that I wanted to configure it that way.
Configuring TSIG On The Master DNS Server
Generating Keys
Go to the server that is the master for the zone(s) for which you want to use with TSIG. TSIG needs a key to be generated, and for that we’ll use dnssec-keygen, which is a tool (included with BIND) that generates DNSSEC and TSIG keys. To tell dnssec-keygen that we’re generating a host key rather than a DNSSEC zone key we use the ‘-n HOST’ argument, and in this case we’ll call it “tsigkey”, but it really doesn’t matter too much what you call it:
dnssec-keygen -a HMAC-SHA512 -b 512 -n HOST -r /dev/urandom tsigkey
Running this command will generate two files with names based on ‘tsigkey’:
-rw-rw-r-- 1 john john 116 2013-06-05 20:10 Ktsigkey.+165+49047.key
-rw------- 1 john john 232 2013-06-05 20:10 Ktsigkey.+165+49047.private
If you look inside the .private file, it looks like this:
john@dns1:~$ cat Ktsigkey.+165+49047.private
Private-key-format: v1.3
Algorithm: 165 (HMAC_SHA512)
Key: Ok1qR5IW1ajVka5cHPEJQIXfLyx5V3PSkFBROAzOn21JumDq6nIpoj6H8rfj5Uo+Ok55ZWQ0Wgrf302fDscHLw==
[...]
The only bit we care about is the big string of characters after the Key: label. You’ll want to copy that text, because next we put it in a BIND configuration file. Edit a new file (in this case I use vi) named as you please – in this case I’m mimicking the name of the other bind configuration files, but you certainly don’t have to:
sudo vi /etc/bind/named.conf.tsigkeys
..and complete it as follows. Make sure the key is in quotes, and look out for the semicolons! I’ve called this key “my-tsig” because that’s the kind of thing I’m sure you’re expecting!
key "my-tsig" {
 algorithm HMAC-SHA512;
 secret "Ok1qR5IW1ajVka5cHPEJQIXfLyx5V3PSkFBROAzOn21JumDq6nIpoj6H8rfj5Uo+Ok55ZWQ0Wgrf302fDscHLw==";
};
Save the named.conf.tsigkeys file.
Tell BIND About The Keys
Next we’ll hook the key definition file into BIND. Edit the named.conf file:
sudo vi /etc/bind/named.conf
…and add in the new file we just created at the end:
include "/etc/bind/named.conf.options";
include "/etc/bind/named.conf.local";
include "/etc/bind/named.conf.default-zones";
// ADD THE LINE BELOW
include "/etc/bind/named.conf.tsigkeys";
So now when BIND loads, it will also include the key definition for “my-tsig”.
Secure Specific Zones
We need to tell BIND which zones we want to apply the TSIG key to. In this case, I’m choosing to apply it only to one zone out of a few that are in my configuration, so I’m going to add the key information within the zone configuration under the allow-transfer element:
zone "mysecuredzone.com" {
 type master;
 file "/etc/bind/zones/db.mysecuredzone.com";
 allow-transfer {
  key "my-tsig";
 };
};
Note that by putting the word ‘key’ in front of the name, it tells BIND that this is a TSIG key rather than an ACL name. You’ll also note that I don’t have to have the IP address of the secondary (slave) servers listed, because what you’re saying here is that any server that has the right key will be allowed to perform zone transfer. In fact if you do add in the IP address of your secondary, you will be allowing that server to do non-TSIG transfers, which is probably not what you had intended.
Now restart BIND:
sudo /etc/init.d/bind9 restart
You should see [OK] when the service restarts. If you get a ‘fail’, then check the syslog to see what the error was.
* Stopping domain name service... bind9 [ OK ]
* Starting domain name service... bind9 [ OK ]
managed-keys-bind
Take a look in syslog anyway. You may well see an error like this one:
Jun 5 21:13:37 dns1 named[28543]: managed-keys-zone ./IN: loading from master file managed-keys.bind failed: file not found
This isn’t fatal, but it’s annoying and the fix is simple:
sudo touch /var/cache/bind/managed-keys.bind
The master server for my “mysecureddomain.com” domain is now ready to rock and roll. We just need to configure the secondary, so let’s do that next.
Configuring The Secondary Server
On the secondary server, create the same keyfile you created on the master:
sudo vi /etc/bind/named.conf.tsigkeys
…and copy in the same content, but this time also add an entry for your master server telling it which key to use. In this example I’m using an example IP of 192.168.2.254 as my master server’s IP:
key "my-tsig" {
 algorithm HMAC-SHA512;
 secret "Ok1qR5IW1ajVka5cHPEJQIXfLyx5V3PSkFBROAzOn21JumDq6nIpoj6H8rfj5Uo+Ok55ZWQ0Wgrf302fDscHLw==";
};

server 192.168.2.254 {
 keys { my-tsig; };
};
Then go hook it into BIND in the same way as on the master, by editing named.conf:
sudo vi /etc/bind/named.conf
and adding this line:
include "/etc/bind/named.conf.tsigkeys";
Then restart BIND:
sudo /etc/init.d/bind9 restart
In theory, you’re now ready to roll.
Testing TSIG
Go to the secondary and try grabbing a zone transfer (put in your master dns server’s IP and choose the appropriate domain name):
dig @{master-dns-ip} mysecuredomain.com axfr
With any luck, you’ll get on error like this:
; <<>> DiG 9.7.3 <<>> @dns1 mysecuredomain.com axfr
; (1 server found)
;; global options: +cmd
; Transfer failed.
This is a good thing because it means a non-TSIG transfer is being denied! Now let’s try the same thing but this time force dig to use the TSIG key (which means using sudo):
sudo dig @{master-dns-ip} mysecuredomain.com axfr -k /etc/bind/named.conf.tsigkeys
Hopefully you will now see a zone transfer scroll by! If you do, TSIG is working.
Slave of a Slave
It’s a bit meta, but in my case dns3 is a slave to dns2 (which is a slave to dns1). From dns3’s perspective, dns2 is its master. To that end, dns2 needs to be configured a little bit like a master too.
On DNS3, we follow the same steps we followed for DNS2 above.
Then on the DNS2 slave, we configure each secured zone in named.conf.local with the allow-transfer element:
allow-transfer {
 key "my-tsig";
};
…just like we did on the master (DNS1). DNS3’s configuration tells it that DNS2 is the master, so it will be looking in the right place for updates. Restart BIND on DNS2 and DNS3 so that the changes take effect, and we can now repeat the TSIG testing above, this time issuing the dig commands on DNS3, and using DNS2’s IP address as the target.
And That’s It!
It really was that simple. You too can go completely overboard on your home network.
Coming soon: forcing visitors to my home to use guest WiFi, two factor authentication and a VPN client if they want to access my network…
TMTOWTDI
Echoing the perl mantra that there’s more than one way to do it, it should be noted that this is just one way to configure things. If you work with BIND much you’ll know that configuration can go in multiple places and be abstracted to quite some degree through server definitions, acls, and so forth. So please understand this is just one way to do it that works in my small home environment, and may not be the ideal way to do it in, say, a large enterprise!
Updated 2013/6/10: Oops – I forgot to include the master server configuration on the secondary server’s named.conf.tsigkeys configuration. Added description and code. Also fixed reversed directory names in touch command.

You are probably the only person I know using TSIG on their home network, or that has 3 DNS servers in their home network. I’d guess that your home network is probably more advanced/secure/larger than the majority of small business networks.
Cheers!
That’s probably a good thing, I would imagine! You know the problem though – geek uses home network as their personal lab…
Good information and easy to follow. Had to use a bit different syntax to get the zone transfer to work in our environment but the article still got me in the right direction.
I’m not sure, but if you do the IP restrictions in the options directive and the key restrictions in the zone directives, then it seems possible use both criteria.
I just read your tutorial and it really helped me!
But I think there is a crucial point missing:
One should ensure that the permissions for the file named.conf.tsigkeys are matching those of the Ktsigkey.+165+49047.private file (nobody except root can read it, since it contains the private key):
chmod 600 /etc/bind/named.conf.tsigkeys
Thanks for the concise solution!
Thanks for the article!
You describe all the steps in a pretty clear language and this really helps me a lot !
why do you use private keys and not public key in your conf file?
john@dns1:~$ cat Ktsigkey.+165+49047.private
instead of
john@dns1:~$ cat Ktsigkey.+165+49047.key
Good question; I should probably have included a little bit more background on this before diving in.
The TSIG keys in this case are being used as a shared secret between any given pair of BIND servers, so we’re really just using the dnssec-keygen tool as a handy way to generate a nice secure shared secret that’s already encoded in Base64 as required by BIND. ISC (authors of BIND) use this mechanism themselves in their documentation, e.g. http://ftp.isc.org/isc/bind/9.6.3/doc/arm/Bv9ARM.ch04.html#id2571082
You could achieve a similar result at the command line, so long as the key is a multiple of 4 characters long (if I understand the documentation correctly):
…but why put yourself out creating a likely not-very-random key when you can just let something else do it for you?
As the tool name “dnssec-keygen” suggests, it’s also able to create and sign public/private keypairs for use with dnssec to secure zones, but that’s not how we’re using it here.
thanks for the info and nice tutorial 🙂
vi /etc/bind/named.conf.tsigkeys i didnt find this file.Though i have installed bind*.
Correct; I should have been clearer that this is a file that you are creating to put your keys in. In the next step, you’ll tell BIND to load the file.
You have a code display error in step “Secure Specific Zones”
Fixed, thank you!