
Recent versions of firmware (after v0.80) running on the Northbound Networks Zodiac FX can be updated directly from the web interface, or using XMODEM via the serial console. But what if, say, you had sat one your Zodiac FX for a while and are running firmware earlier than v0.81 and have a sudden, unexpected desire to upgrade the firmware? Say you are, for example, me?
The process turned out to be less straightforward than I had hoped, so I am documenting the successful steps I followed in case it’s of use to somebody else.
My (Brief) Zodiac FX Background
Back in 2015 I backed a Kickstarter project for this awesome-sounding four-port FastEthernet SDN switch with OpenFlow support. It sounded so cool that I even ordered a two-pack as I thought it would be more fun to have two OpenFlow switches to mess around with). The project was funded successfully, but embarrassingly when the beautifully-made boards arrived in early 2016, for some reason I never quite got around to playing with them. I think it was in part because it was just a printed circuit board without a case and without easy access to 3D printing I was turned off trying to use them. In retrospect I realized that have very kind friends who have 3D printers and while I couldn’t reasonably ask them to actually design the case for me, somebody else did eventually put up a Zodiac FX case on Thingiverse (although to be honest it doesn’t look great and I intend to design my own, hopefully better case).
Either way, the boards languished in my office/lab space at home until this week when I stumbled across one of them again and thought “Oh, I wonder what’s going on with Northbound” and discovered the unfortunate reality of what 2020 did to Paul Zanna’s creation. Nonetheless, the hardware still works, so there’s no time like the present to upgrade the firmware, right? And that’s where you join me in my journey.
The (Legacy) Upgrade Process
The most important thing to have in this process will turn out to be a working USB to MicroUSB cable connecting a host PC to the Zodiac board. The USB cable powers the board and also offers a serial console connection to the host. In order to upgrade the firmware, the host computer must be able to see and use the serial console connection over the USB.
Testing The Serial Connection (macOS)
In my case, I am running macOS Catalina and when I plugged in the Zodiac FX, a new device appeared in /dev, tty.usbmodem1412401. This turned out to be the Zodiac switch, as a quick test was able to validate. After entering screen, hit ENTER a couple of times to trigger a response:
~$ screen /dev/tty.usbmodem1412401

 _____             ___               _______  __
/__  /  ____  ____/ (_)___ ______   / ____/ |/ /
  / /  / __ \/ __  / / __ `/ ___/  / /_   |   /
 / /__/ /_/ / /_/ / / /_/ / /__   / __/  /   |
/____/\____/\__,_/_/\__,_/\___/  /_/    /_/|_|
            by Northbound Networks


Type 'help' for a list of available commands

Zodiac_FX# show status

----------------------------------------------------------------
Device Status
 Firmware Version: 0.57
 CPU Temp: 27 C
 Uptime: 00:00:50
----------------------------------------------------------------

Zodiac_FX#
Bingo bingo, it’s alive and it’s running an old firmware version! To disconnect from the screen session, use Ctrl-A then Ctrl-D. Linux users should have a similar experience, but Windows users may need to install a USB driver before they see the USB device as a COM port; I have only tested it in macOS so far.
The Base Firmware Update Steps
The full procedure can be found in section 2.3 of the Northbound Networks Zodiac FX User Manual, a copy of which I am mirroring here just in case the original becomes unavailable.
In brief, the steps are to download the “full install” firmware file (currently v0.86), then:
- Power down the board and set the ERASE jumper
- Power up the board for 5 seconds
- Power down the board and remove the ERASE jumper
- Power up the board; it’s now ready to accept firmware
- Run the Atmel “SAM-BA Programmer” software to load the full firmware file to the board.
- Power the board off, then power it back on (i.e. reboot the board)
- Profit!
Steps 1 to 4 went just fine and the board flash was erased successfully, ready to be programmed just in time for me to discover that the link to the Atmel SAM-BA Programmer software from the Northbound Networks update page no longer works (I won’t include it here since it’s broken). The next problem was that when I located a download for Atmel SAM-BA (now Microchip SAM-BA since Microchip acquired Atmel), I found that it was only available for Windows and Linux, but since I had a Windows device available I decided to use that. Unfortunately, despite the February 2020 release date, the software simply did not seem to work in Windows 10 and left complaints about DCOM permissions in the event log. I would have used linux, but I did not have a suitable host on which to map a USB device through to the guest OS.
Shumatech BOSSA
In the end I discovered Shumatech’s BOSSA, an open-source replacement for Atmel’s SAM-BA which is available for Windows, Linux and macOS. Installation was slightly tricky, in that the installer not only requires the application to be dragged on an Applications folder shortcut, but also requires two CLI tools (bossac and bossash) to be dragged on to a folder shortcut to /usr/local/bin and macOS apparently does not like doing that. However, double clicking on the bin icon opens up the folder in Finder, and the two CLI tools can then be dragged from the installer to the Finder window instead:
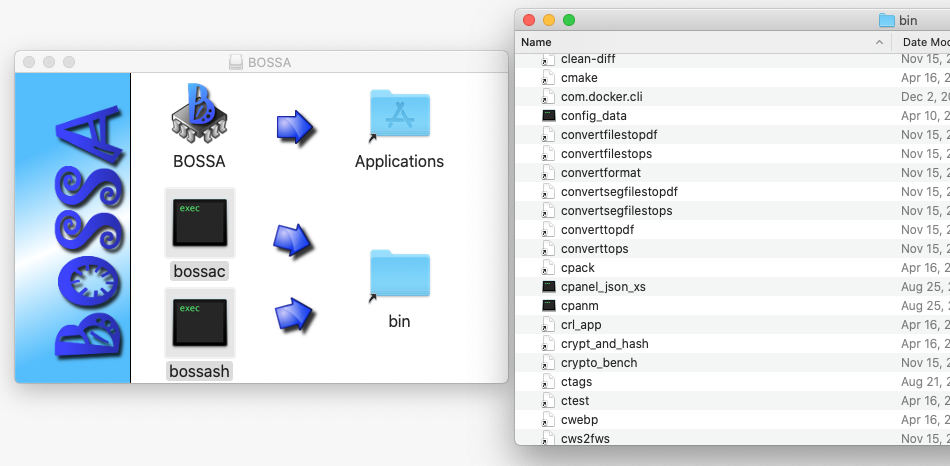
With that minor annoyance resolved, it was time to go to the shell and see if BOSSA worked as advertised.
Using BOSSA
With the Zodiac board plugged in and powered up on USB, I tried the bossash utility first to confirm if it could communicate with the device, and was delighted to see that it could:
~$ bossash
bossa> connect tty.usbmodem1412401
Connected to device on tty.usbmodem1412401
bossa> info
Device       : ATSAM4E8
Version      : v1.0 May 10 2012 18:12:25
Address      : 0x400000
Pages        : 1024
Page Size    : 512 bytes
Total Size   : 512KB
Planes       : 1
Lock Regions : 64
Locked       : none
Security     : false
Boot Flash   : false
bossa>
That’s good news, so then I tried using the bossac tool to install the “full install” binary. I selected the command line options based on comments in the user manual like:
When the “Lock region(s)” pop-up window appears select ”No”
I converted that to the option --unlock. Similarly:
Under the “Scripts” section, select “Boot from Flash (GPNVM1)” from the drop down list
…became --boot=1 (0 is ROM, 1 is flash). It’s actually the default, but I prefer setting an explicit option for clarity. The final result was as follows:
~$ bossac --erase --verify --port=tty.usbmodem1412401 --write ZodiacFX_v86_Full_Install.bin --unlock --boot=1
Unlock all regions
Erase flash

Done in 4.777 seconds
Write 499284 bytes to flash (976 pages)
[==============================] 100% (976/976 pages)
Done in 16.924 seconds
Verify 499284 bytes of flash
[==============================] 100% (976/976 pages)
Verify successful
Done in 13.204 seconds
Set boot flash true
~$
No Profit Quite Yet
With a successful write showing, I powercycled the board and connected to the serial power expecting to see the Zodiac FX prompt, but it was not to be:
[Connected]

Zodiac FX BIOS 1.10

No firmware installed, please type 'upload' to install new firmware.
If there is no firmware installed then what exactly did I just do with BOSSA? It took me a moment to realize, but there’s a subtle clue here. The option to upload a firmware update via the serial port was added in v0.81, and the BIOS seems to be offering me the option to upload a firmware update, which means that I must be running a newer version of the firmware, or at least enough of it to get into the BIOS. With that in mind I downloaded the ‘update’ firmware and used XMODEM to transfer the file to the board.
Ok, Boomer; XMODEM?
Yes, kiddo; XMODEM. Back when I was a child, it was possible to recover seemingly unrecoverable Cisco routers from ROMMON by loading a new IOS image over the serial port using the XMODEM protocol. If I felt brave, I would up the ante and use YMODEM. The update file for this board is only 200KB; now imagine how it felt transferring an IOS image over a serial port. Anyway, the point is, it’s possible to transfer a file over the serial port, and XMODEM is one way to do it. Unfortunately, screen does not support XMODEM, but I do have a serial terminal emulator app called Serial which connects to just about anything which looks like a serial port and it supports XMODEM, so:
Bootloader# upload
Please begin firmware upload using XMODEM
signature padding 1 found
signature padding 2 found
signature padding 3 found
signature padding 4 found
[Disconnected]
[Connected]

 _____             ___               _______  __
/__  /  ____  ____/ (_)___ ______   / ____/ |/ /
  / /  / __ \/ __  / / __ `/ ___/  / /_   |   /
 / /__/ /_/ / /_/ / / /_/ / /__   / __/  /   |
/____/\____/\__,_/_/\__,_/\___/  /_/    /_/|_|
            by Northbound Networks


Type 'help' for a list of available commands

Zodiac_FX#
Zodiac_FX# show version
Firmware version: 0.86

Zodiac_FX#
There may be other ways to XMODEM in macOS rather than using Serial (indeed, I’ve seen a way to do it using screen, and screen doesn’t cost a pile of money), but that’s the tool I had to hand, so I used it. Windows users with HyperTerm may now laugh because they have that tool available for free.
Don’t Forget To Reset!
Just one, tiny little note which is easily overlooked:
If you are upgrading from 0.57 or below you must run the “factory reset” command (in config mode) after updating the firmware and then restart the switch to re-align the config ROM
After the upgrade, the board did not respond on its default IP address of 10.0.1.99 any more, which seemed odd. Thankfully, that was easily fixed:
Zodiac_FX(config)# factory reset
Writing Configuration to EEPROM (198 bytes)
Zodiac_FX(config)# restart
Restarting the Zodiac FX, please reopen your terminal application.
[Disconnected]
[Connected]
Set a Management IP
The Northbound Networks Zodiac FX was now ready to be configured:
Zodiac_FX# config
Zodiac_FX(config)# set ip-address 192.168.2.238
IP Address set to 192.168.2.238
Zodiac_FX(config)# set netmask 255.255.255.0
Netmask set to 255.255.255.0
Zodiac_FX(config)# save
Writing Configuration to EEPROM (198 bytes)
Zodiac_FX(config)# restart
Restarting the Zodiac FX, please reopen your terminal application.
[Disconnected]
[Connected]
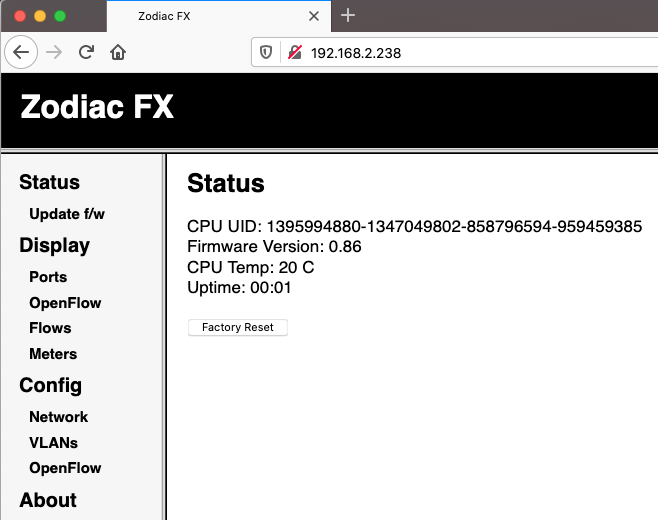
The IP address configured above will only be accessible on port 4. This interface is configured by default to be the management interface (and the one which should face the OpenFlow controller), as can be seen when viewing the port status, where Port 4 has a VLAN type of “Native” rather than “OpenFlow”:
Zodiac_FX# show ports

----------------------------------------------------------------

Port 1
 Status: DOWN
 VLAN type: OpenFlow
 VLAN ID: 100

Port 2
 Status: DOWN
 VLAN type: OpenFlow
 VLAN ID: 100

Port 3
 Status: DOWN
 VLAN type: OpenFlow
 VLAN ID: 100

Port 4
 Status: UP
 VLAN type: Native
 VLAN ID: 200

----------------------------------------------------------------
So with an ethernet cable connected to port 4, the web interface was finally visible!
Future Firmware
Should a future firmware be released, it can be uploaded using the “Update f/w” option in the web interface, which sounds significantly simpler than the process above. That said, based on the dates of the last file updates of the Northbound Networks Zodiac FX firmware in GitHub and the recent news about Northbound Networks, I’m not honestly expecting any further updates.
I hope that was useful and/or of interest. If you have a Zodiac FX, please let me know if you used it and what you got up to with it!

Leave a Reply