

I’m a fan of Network Attached Storage (NAS) devices; they’re a handy way to keep lots of data “backed up” but still online and available. They’re great for sharing data with my family, and I get a small amount of comfort about running RAID, although of course that should only be one level of backup in a sensibly redundant data protection plan.
I picked up a QNAP TS-410 4-drive NAS device a few weeks ago, and since it is quite a capable device with strong competition from the likes of Synology, Netgear, Iomega and Drobo, I thought it might be useful to share some of my experiences setting up and using the device.
Note: I specced out and purchased my QNAP and its drives literally just before the flooding in Thailand which has since caused hard drive (HDD) prices to double. That did make the economics of my decision a little easier on the wallet than it would be if I had to buy it today.
The History

My Buffalo Terastation is definitely feeling its age, and recently it spewed its first ever disk error warning emails, which caused me to start looking at the options in front of me to either upgrade or replace. As it turns out my old Terastation is based on PATA drives and is limited to 2TB total storage, which isn’t much of an upgrade given that I currently have 1TB and I had filled that over 90%. Still, I priced it up nonetheless and was wholly unconvinced that this was a good way forward, especially as PATA drives are becoming less common and thus more expensive.
I looked at buildng my own system for a while – specifically with the idea of maybe running OpenFiler or FreeNAS – in the end I calculated that while infinitely more flexible and undoubtedly more powerful than buying a NAS appliance, in actual fact the cost of a barebones system (with a case that could handle lots of drives) versus a low-end NAS appliance wasn’t really that different, and the barebones PC was going to take up ten times as much space in my office, use more power, and make more noise. And honestly I couldn’t be bothered building and supporting it at this time. I’ll probably live to regret that decision, but there it is.
That left me looking at a new NAS appliance. I spent hours on end comparing the prices and features of a wide range of vendors to meet my basic needs, which are:
- NAS Appliance
- 4 or more SATA drive bays
- RAID5 or better
- DLNA-compliant media sharing
- Possibly some kind of cloud connectivity in case I decide to go that route for backup
- Relatively cheap.
This list struck a few basic models from the list (anything USB-connected, and a few less competent options), but otherwise there was a bewildering array of valid options, and as is always the way, price ends up being the big compromise – there are NAS out there with 8 bays and multiple Gigabit Ethernet interfaces on them, driven by hugely fast processors, but they cost lots of money which breaks my final point.
Thus I ended up with a QNAP TS-410 Turbo NAS. With a street price around $360 (not including drives), you can perhaps see why the barebones PC was not much cheaper. It has a small footprint, it’s very quiet, and once you’ve slapped the drives in and set up the OS, configuration is very fast.
Hard Drives
This is where things got tricky. When I priced up SATA drives for the NAS, I saw that I could get 2TB “green” drives for about $84 each, which sounds pretty cool. However, when I looked more closely at them there was a specific warning saying that they were not intended to be used in a disk array, and were not designed for 24/7 use. Given that my Terastation has been running for 5 years now without interruption, this is a little concerning. The alternative is to get proper enterprise-grade drives – which were running $104 each for 1TB (most cost, half the storage). On the up side, these drives are designed from the outset to be in an always on environment, being driven hard. MTBF for both drives is so unrealistically high that I’m not sure I believe them based on my previous experience. If I go with the green drives I could have double the capacity, and while it’s more likely that they might fail, replacing them would be much cheaper. Arrgh.

In the end I played it safe and got four Western Digital 1 TB RE4 SATA 3 Gb/s 7200 RPM 64 MB Cache Bulk/OEM Enterprise hard drives (model WD1003FBYX). If they fail, I will go shout at Western Digital. The picture above shows one of the drives mounted in one of the HDD caddies, ready for insertion into the NAS.
Assembly
There’s not much to do to assemble the QNAP to be honest.
It has four lockable drive bays, and assembly is as simply as screwing a drive into each slide out hard drive tray and sliding them back in until the front plate clicks in place. This probably took all of 15 minutes, most of which time was spent opening packaging.
Other than that, there’s a power cord and a network cable to connect and I’m good to go.

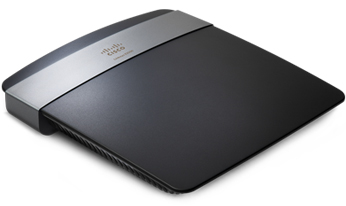
There are actually two Gigabit Ethernet ports on the back, allowing you to configure port trunking (with a variety of load balancing mechanisms offered), or to have them configured independently (e.g. on two different networks). For the moment, I’m single homing the NAS as I have no concerns about 1000MBps causing a throughput problem. On the other hand if I were running FastEthernet, I might optimistically consider the benefits of running a 200MB trunk for data.
The other ports in the picture above are two eSATA ports for expansion, and three USB ports, used to connect additional USB hard drives, printers and so forth. It’s of note that the QNAP uses an external power brick; this can be a pain from the perspective of finding somewhere to put the brick itself, but it’s actually a smart move – the heat generated by the PSU is kept outside the chassis, which reduces the cooling requirements for the NAS.
Installation and Configuration

The box comes with everything you need – even two short Ethernet cables. I’m leaving my drive bays unlocked, but obviously if you choose to lock them, make sure you don’t lose the keys!
So here we are all ready to roll. The front of the chassis has the four drive bays, a power button and a USB port with a “One-Touch USB ‘Copy'” button surrounding it. Other than that, the top (black) section of the NAS above the drive bays looks like it should be some awesome display, but in fact is mostly unused apart from four diagnostic LEDS – one for Power, and one each for activity/connectivity on LAN, USB and eSATA. There are four further hidden LEDs right along the bottom of the black area, aligned one above each drive bay – the disk activity lights.
Contacting the NAS for the first time – for Windows and Mac users at least – is via the QNAP Finder software that’s provided on the included CD. You can set the admin password, then enter the Quick Configuration screens where you decide on the disk array type (it needs to be formatted) and the firmware to install. The first thing to note here is that the formatting process is not fast (it’s a lot of space to format!). The next problem I found was that while the firmware installation turned out to have worked just fine, it wasn’t clear when it was finished and ready for me to proceed. The NAS itself is not terribly communicative – it gives status using a combination of beeps and LED colors and patterns. An explanation (secret decoder ring) can be found in the user guide, but it’s disturbing when you first hear the various sets of beeps as the NAS boots up and comes online.
In the end I was able to login and get configuring the more advanced features.
Network Services
Without boring you too much, here are the elements I have configured and used so far:
- IPv6 (why not)
- Microsoft Networking (standard Windows file sharing type thing)
- Apple Networking (AFP)
- FTP access
- UPnP discovery
- Bonjour (Apple’s preferred discovery service)
- iTunes Server (*)
- UPnP Media Server (for PS3 etc) via TwonkyMedia
- Apple Time Machine
- Antivirus (free)
(*) The latest version of iTunes changed something and broke the iTunes Server functionality that’s provided in the current firmware; however with the judicious application of FireFly, I have it working again.
Effectively we are accessing the files from Mac and Windows platforms successfully, I’m able to browse the media from the PS3, and we can also access all non-DRM’d music from our shared iTunes libraries from our computers (it appears as a Shared device in iTunes).
I’ve created usernames for each of us that needs access, and created groups where helpful to apply the appropriate access controls to file shares. It’s of note that the QNAP can optionally hand off authentication to LDAP or Active Directory as well.
Things I’m Not Yet Using
I’m certainly not using all the options on the QNAP TS-410. One handy function is the Download Station – tell it files you want it to grab from another server (e.g. on the Internet via HTTP, FTP, Rapidshare or BitTorrent) and it will go download them for you straight to the NAS without you having to leave your PC running. Sounds like a useful idea, and I may try it some time.
The QNAP is also a web server – you can create your own web site on it. So far I don’t think I have a need for this function, but you never know – maybe a little intranet will be handy just to keep information in a central place?
Things I Don’t Yet Know I Need
I can’t tell you what I will need in the future because I don’t know yet. What I do know is that you can expand the functionality of the QNAP using pre-built packages called QPKG Plugins, similar in concept to the usual Linux distro package mechanisms. FireFly Media Server (used for the iTunes Server, formerly known as mt-daapd) is an example of a QPKG plugin that allowed me in this case to fix my iTunes problem before an official firmware fix has been made available. If you want to run a WordPress blog on the built-in web server, that’s a QPKG plugin, as are Gallery, Python, Joomla and many more.
You can also SSH to the NAS for administration of the device itself, or to maintain web pages and so forth. Clearly, the GUI is a simpler method for maintaining settings, but if you like digging around configuration files to make things work the way you like, there’s nothing stopping you. The OS running is a linux variant that identifies itself thus:
[~] # uname -a
Linux NAS 2.6.33.2 #1 Sun Oct 2 02:10:57 CST 2011 armv5tel unknown
It’s not exactly full-featured and there are no man pages, but if you know your way around sh you can do most anything you need.
One final point – this particular NAS only has 256MB of RAM, so you’re always going to be a little limited in what you can do. Other QNAP models have different amounts, so if you want to use your NAS to do lots of things for you, you might want to take that into consideration. Some people out there are even putting other distros on the NAS – do so at your own risk, of course.
Backup and Remote Access
QNAP provides a Windows backup client on the included CD; I haven’t installed it yet, but I will probably do so in the near future and report back on how that goes. I’d like to have automated backup while I’m on the network. For Mac there’s no need – just use Time Machine.
I’ve also installed QMobile on my iPhone; this allows me to access my shared multimedia folder contents from my phone. So far I’ve used it to stream music and view photos while on my LAN, but if I allowed it, the NAS will apparently also use UPnP to punch appropriate holes/mappings in your firewall and assuming you register your WAN IP with a DNS server somewhere, you can access your content from anywhere. I’m not sure I’m ready to open this up to the Internet yet, so I’ll be holding fire on that. Nonetheless, being able to stream the audio is very handy given that the Music app (was iTunes) on the iPhone doesn’t appear to find folders shared from an iTunes Server.
Conclusions
All in all, I like the QNAP TS-410. I can’t compare it to the alternatives I evaluated online simply because I don’t have them here to try. However, I’ve been able to find a solution to everything I needed so far; the support forums are quite active and there’s a lot of knowledge out there. I stumbled a little with the iTunes server, but I soon found a thread with an explanation detailing the FireFly QPKG workaround.
For the price, I can’t argue – it’s really a very well featured device and so far I’m very happy with it and would absolutely recommend it.
I’d love to hear your feedback on QNAP devices, or if you have a device from a different vendor and want to recommend it, please comment below.

Very detail review indeed. I have a TS210 and looking to upgrade to 410. This looks like another site which might also be helpful for doing nas comparison nas review
Hi, great review. Can I use the QNAP with my macbook?
Yes – your MacBook should be able to connect to any of the QNAP NAS devices over the network in two ways:
1) as a regular Windows file share
2) as a Time Machine destination
My wife has her MacBook Air configured to use the QNAP for Time Machine, and it seems to work well. I forget now if it’s a module I had to add, or if it was integrated into the default build, but either way it was easy to set up.